Ready to explore the world of digital organization but wondering exactly what a digital planner entails?
You’ve come to the right place! At its core, a digital planner is essentially an interactive PDF file designed to look and function much like a traditional paper planner.
The key difference is that you use it on a tablet (like an iPad or an Android tablet) within a dedicated note-taking app (such as GoodNotes, Notability, Noteshelf, Penly, or others).
Now, you might think, “Isn’t that just like my phone’s calendar or a basic notes app?” Not quite.
While calendar apps are great for scheduling appointments and note apps are useful for jotting down quick thoughts, a digital planner offers a much more structured and integrated layout.
It often mimics the familiar design of physical planners, complete with hyperlinked tabs for easy navigation between monthly, weekly, and daily views, alongside dedicated sections for goals, trackers, notes, and more.
Think of it as combining the tactile feel and visual structure of paper planning with the power and flexibility of digital technology.
Making the switch comes with several appealing benefits.
Digital planners offer fantastic portability – your entire planner lives on your tablet, accessible anywhere.
They provide unparalleled customization options, allowing you to add digital stickers, change layouts, and personalize pages easily. They are also eco-friendly, significantly reducing paper consumption.
Furthermore, especially with undated versions that you can reuse year after year, they can offer potential cost savings compared to buying new paper planners annually.
Feeling intrigued? This beginner’s guide is designed to equip you with all the knowledge you need to get started smoothly.
We’ll walk you through gathering the essential tools, help you choose the right planner and app for your specific needs, provide a step-by-step guide to setting up your planner, show you how to use it effectively for organization and productivity, and share valuable tips to make your digital planning journey a success.
Table of Contents
ToggleGathering Your Essential Tools
Now that you understand what a digital planner is, let’s talk about what you actually need to get started.
Unlike traditional paper planning, digital planning requires a specific combination of hardware and software to function. Don’t worry, it’s not overly complicated, but having the right setup from the beginning is key to a smooth and enjoyable experience.
Think of it like assembling a toolkit. For digital planning, your essential toolkit consists of 4 core components:
- A Tablet: This is your primary device, the digital canvas where your planner will live. Popular choices include iPads (like the iPad Pro or standard iPad) and Android tablets (such as Samsung Galaxy Tab or others). While you might view a simple PDF planner on a computer or smartphone, the interactive experience truly shines on a tablet screen.
- A Stylus: While you can type in many digital planners, a stylus (like the Apple Pencil for iPad or various options for Android tablets) is highly recommended. It mimics the natural pen-on-paper writing experience, allowing for handwriting, drawing, and precise interaction with planner elements. It’s crucial for achieving that familiar planning feel.
- A Note-Taking App: This is the software engine that powers your digital planner. Since most digital planners are interactive PDF files, you need a dedicated app that can import these PDFs and allow you to write or type on them, use hyperlinks, add images or stickers, and organize your pages. Popular and capable apps include GoodNotes, Notability, Noteshelf, Penly (Android), Zinnia, and others. Simple PDF viewers might work for basic viewing, but a proper note-taking app unlocks the full potential.
- A Digital Planner File: This is the actual planner itself – the interactive PDF document you purchase or download. These are specially formatted files with structured layouts, hyperlinked tabs for navigation, and designated spaces for your entries.
Crucially, these components need to work together seamlessly.
Your chosen note-taking app must be compatible with your tablet’s operating system (iOS or Android), and the digital planner file needs to function correctly within that specific app.
Taking a moment to ensure compatibility between your tablet, stylus (if applicable), app, and planner file will save you potential headaches and set you up for digital planning success according to Notes by Thalia.
Choosing a Compatible Tablet
As mentioned, a tablet is the cornerstone of your digital planning setup.
But why is it the primary device, and how do you choose the right one?
Simply put, a tablet provides the ideal combination of screen size, touch interface, and stylus compatibility needed to truly replicate the experience of writing in and navigating a physical planner.
It’s the digital canvas where your interactive planner comes alive.
When selecting your tablet, consider these crucial factors:
- Screen Size: This significantly impacts your planning experience. Larger screens (around 10 inches or more, like the iPad Pro 10.5” some users prefer for its smooth feel) offer ample space that feels closer to a traditional planner page, making writing and viewing full layouts comfortable. Smaller tablets are certainly more portable, but you might find them a bit cramped for detailed daily or weekly spreads. Think about where and how you’ll most often use your planner to decide on the best size for you.
- Compatibility with Note-Taking Apps: This is non-negotiable. Your tablet’s operating system – typically Apple’s iPadOS or Google’s Android – dictates which note-taking apps you can install. Since these apps (like GoodNotes, Notability, Noteshelf, Penly, etc.) are the software that allows you to write on, navigate, and interact with your digital planner PDF, you must choose a tablet that supports the app you intend to use. Always check the app’s system requirements before purchasing a tablet.
You’ll find excellent tablet options suitable for digital planning across different brands and price points.
Apple’s iPads (including the standard iPad, iPad Air, and the premium iPad Pro models) are extremely popular choices, known for their fluid performance and seamless integration with the Apple Pencil.
On the Android side, tablets like the Samsung Galaxy Tab series (especially the S line) are strong contenders, offering high-quality displays and compatibility with various styluses. Many other Android tablets can also work well, as long as they run a compatible note-taking app smoothly.
What about using your computer or smartphone? While you can often open and view your digital planner PDF on these devices, and some note-taking apps offer syncing that allows for viewing or maybe minor text edits on the go, they generally don’t provide the optimal planning experience.
The smaller screens on phones make detailed writing and layout viewing difficult, and most computers lack the direct stylus-on-screen interaction that makes digital planning feel intuitive. For the full interactive experience intended by most digital planners, a tablet remains the best choice.
Selecting a Stylus
While you can technically navigate and even type in your digital planner using just your finger, investing in a stylus is highly recommended for unlocking the full potential and enjoyment of digital planning.
Think of it as the digital equivalent of your favorite pen.
Why make the investment? Firstly, a stylus offers vastly improved precision compared to using a fingertip.
Trying to write legibly in small daily boxes, check off tiny habit tracker squares, or accurately tap hyperlinked tabs can be clumsy and frustrating with a finger. A stylus provides a fine point that allows for neat handwriting, detailed drawing, and effortless interaction with all the elements on your planner page. This precision significantly enhances the usability of detailed planner layouts.
Secondly, many users find that a stylus effectively mimics the traditional pen-on-paper experience.
This familiar feeling can make the transition from paper to digital planning much smoother and more intuitive. It allows you to comfortably handwrite notes, brainstorm ideas visually, and personalize your planner in a way that feels natural, replicating the tactile satisfaction of physical planning.
You’ll find various stylus options available. The most well-known are often those made by tablet manufacturers, such as the Apple Pencil (which comes in different generations compatible with specific iPad models) or the Samsung S Pen (designed for certain Galaxy Tabs).
Numerous third-party styluses also exist, offering different features, ergonomics, and price points for both iPadOS and Android platforms.
However, the single most crucial factor when choosing a stylus is ensuring stylus-tablet compatibility.
Not every stylus works with every tablet. Apple Pencils only work with specific iPads, S Pens are tied to particular Samsung devices, and third-party styluses have their own compatibility lists.
Before purchasing any stylus, always verify that it is explicitly stated to work with your exact tablet model. Check the manufacturer’s specifications for both the stylus and your tablet to guarantee they’ll work together seamlessly.
Picking a Note-Taking App
Your digital planner file, typically an interactive PDF, needs a specific type of software to function as intended.
While you can view a PDF in many basic readers, you need a dedicated note-taking app that supports PDF annotation to actually write, type, draw, and interact with your planner pages. Think of this app as the digital binder and pen set for your planner file.
There are several excellent note-taking apps available, each offering slightly different features and user experiences. Some of the most popular choices compatible with digital planners include:
- GoodNotes: Very popular, especially on iPadOS, known for robust features. Also available on Android and Windows.
- Notability: Another strong contender in the Apple ecosystem (iPadOS, macOS), known for its note-taking capabilities alongside PDF annotation.
- Noteshelf: Available across iPadOS, Android, and Windows, offering a good balance of features.
- Penly: A popular and feature-rich option specifically designed for Android users.
- Xodo: A cross-platform option (iOS, Android, Windows) often praised for its PDF handling capabilities, available in free and paid versions.
- Samsung Notes: A capable free option pre-installed on many Samsung Galaxy tablets, supporting S Pen features well.
When choosing an app, consider these key features essential for a smooth digital planning experience:
- PDF Annotation Tools: This is fundamental. The app must allow you to write smoothly with your stylus, type text directly onto the planner, highlight sections, erase mistakes easily, and perhaps even draw shapes or insert images (like digital stickers).
- Hyperlink Support: Most digital planners come with built-in hyperlinks (clickable tabs, dates, or index items) for quick navigation between sections (e.g., jumping from the monthly view to a specific daily page). Your app must support these internal PDF links for the planner to be easily navigable.
- Organization Features: Look for ways to organize your planners and notes within the app, such as using folders, categories, or distinct digital notebooks. This helps keep your planning system tidy as you add more documents.
- Cloud Sync: Many apps offer synchronization via services like iCloud, Google Drive, or Dropbox. This allows you to access and update your planner across multiple devices (e.g., your tablet and smartphone) and serves as a valuable backup.
It’s also important to consider the cost. Some apps are free (like Samsung Notes or basic versions of Xodo), which can be great for starting out. Others require a one-time purchase (like Penly or older versions of some apps) or operate on a subscription model (like newer versions of GoodNotes and Notability).
Paid apps generally offer more advanced features, smoother performance, or more robust syncing and organizational tools, but free options can certainly be sufficient, especially for beginners.
Crucially, before committing to an app, always check its compatibility with your tablet’s operating system (OS). Some apps are exclusive to iPadOS, while others are Android-only or available on multiple platforms (iOS, Android, Windows).
Check the app’s description in your device’s app store (Apple App Store, Google Play Store, etc.) to confirm compatibility and review its features and pricing structure.
To help you compare, here’s a quick overview of some popular options:
| App Name | Key Features for Planning | Typical Price Model | OS Compatibility |
|---|---|---|---|
| GoodNotes | Excellent annotation, hyperlink support, organization (folders/notebooks), elements tool for stickers, sync. | Subscription (with limited free version) / One-time purchase (legacy version) | iPadOS, macOS, Android, Windows |
| Notability | Smooth writing, audio recording sync, hyperlink support, organization (subjects/dividers), sync. | Subscription (with limited free version) | iPadOS, macOS |
| Noteshelf | Natural writing feel, hyperlink support, organization (groups/categories), audio recording, sync. | One-time purchase per platform | iPadOS, Android, Windows, macOS |
| Penly | Feature-rich annotation, hyperlink support, sticker organization, customization options. Designed for Android. | One-time purchase | Android |
| Xodo | Strong PDF handling, annotation tools, hyperlink support, cross-platform sync. | Free (basic features) / Subscription (Pro features) | Android, iOS, Windows |
| Samsung Notes | Good S Pen integration, annotation, basic organization, hyperlink support, sync (Samsung Cloud/OneDrive). | Free (pre-installed/downloadable on Samsung devices) | Android (primarily Samsung), Windows |
Note: App features, pricing, and compatibility can change. Always check the official app store listing for the most current information.
Finding Your Digital Planner File
Okay, you’ve selected your tablet, chosen a stylus you like, and picked out a note-taking app that fits your needs.
The final core component you need is the actual digital planner file.
This is the heart of your setup – the template containing all the layouts, pages, and designs you’ll interact with daily.
Think of the digital planner file as the core template, most commonly delivered as an interactive PDF document.
This isn’t just any PDF; it’s specifically designed with built-in, clickable hyperlinks. These links allow you to effortlessly navigate between yearly, monthly, weekly, and daily views, as well as jump to specific sections like goals, trackers, or notes – all within your note-taking app. It’s essentially the digital version of the physical planner book you might buy.
So, where can you actually obtain these digital planner files? You have several excellent avenues to explore:
- Online Marketplaces: Websites like Etsy are incredibly popular destinations. They host thousands of digital planners created by independent designers, offering a massive variety of styles, layouts (dated and undated), and niche themes. You’re likely to find something that suits your aesthetic and functional needs here.
- Dedicated Creator Websites: Many talented digital planner creators sell their products directly through their own online shops or websites. Buying directly can sometimes offer unique bundles, specialized planners (like those for business, hobbies, or specific professions), or a closer connection to the designer.
- Freebies and Samples: Don’t underestimate the value of free resources! Many creators and bloggers offer free sample planners or basic versions as a way for you to try digital planning or as an incentive for signing up for their newsletters. This is a fantastic risk-free way to dip your toes in before purchasing a more comprehensive planner.
As you browse, you’ll mainly encounter two types of files:
- Interactive PDF (.pdf): This is the most common and versatile format. These specially crafted PDFs contain the embedded hyperlinks crucial for navigation. As long as your chosen note-taking app supports PDF annotation and hyperlinks (which most recommended apps do), these planners should work seamlessly.
- .goodnotes File: If you’ve chosen the GoodNotes app (primarily on Apple devices, but expanding), you might find planners offered specifically in a
.goodnotesformat. These files often import directly into the app and might come pre-loaded with elements like digital stickers already set up within the file. The main limitation is that this format is typically only usable within the GoodNotes app itself. While less common, some other apps might have their own proprietary formats, but interactive PDF remains the most universal standard.
This leads to a critical final point: always check for compatibility.
Before you hit download or purchase, carefully read the planner’s description to confirm it is compatible with the specific note-taking app you decided to use in the previous step.
Most sellers clearly list the apps their planners are tested and designed for (e.g., “Compatible with GoodNotes, Notability, Noteshelf, Penly, Xodo”).
A planner optimized for one app might have navigation issues or features that don’t work correctly in another. Ensuring compatibility beforehand will save you potential frustration and ensure your digital planner works as intended.
How to Choose the Right Digital Planner for You
You’ve gathered your tools, picked your note-taking app, and know where to find digital planner files.
Now comes the exciting part: selecting the actual planner that will become your organizational hub!
With countless options available, from minimalist designs to feature-packed templates, choosing the right one can feel overwhelming.
However, taking the time to select a planner that genuinely aligns with your personal needs, goals, and planning style is paramount.
The right planner isn’t just about aesthetics; it’s about functionality that enhances your usability and encourages consistency in your planning routine.
Before browsing marketplaces like Etsy or creator websites, take a moment to reflect on how you intend to use the planner.
Are you primarily looking for straightforward daily or weekly scheduling?
Do you need robust sections for detailed project management, tracking tasks, and meeting deadlines?
Perhaps your focus is more on personal growth, requiring space for habit tracking, goal setting, meal planning, fitness logs, or even journaling and gratitude practices?
Maybe you need a specialized planner for work, studies, content creation, or managing finances.
Understanding your core purpose will significantly narrow down your options and guide you toward a planner structure that truly serves you.
As you explore different digital planners, keep these key factors in mind to ensure you find the best fit:
- Date Format (Dated vs. Undated): Dated planners come with pre-filled dates for a specific year, making them ready to use immediately, much like a traditional paper planner. Undated planners offer flexibility – you fill in the dates yourself, allowing you to start anytime and potentially reuse the planner year after year (a great cost-saving and sustainable option). Consider if you prefer the convenience of dated or the reusability of undated.
- Layout: Planners come in various layouts, typically for weekly and daily views. Common options include vertical layouts (columns for each day), horizontal layouts (rows for each day), hourly schedules, or more flexible block layouts. Think about how you visualize your time and tasks. Do you need timed slots, or just space for lists? Look at previews to see which layout feels most intuitive for your planning style.
- Content and Sections: Beyond basic calendar views, what specific pages or sections do you need? Look for planners that include dedicated areas for things important to you, such as monthly goal setting, weekly reviews, habit trackers, budget sheets, project planning pages, note sections (dotted, lined, grid, blank), contact lists, or specialized templates relevant to your life (e.g., wellness trackers, content calendars, lesson plans). Choose a planner with contents that match your lifestyle and objectives.
- Features and Design: Ensure the planner has functional hyperlinks for easy navigation between sections (this is crucial!). Consider the overall aesthetic – do you prefer a minimalist design, something colorful and decorative, or a professional look? While looks aren’t everything, choosing a planner you enjoy looking at can motivate you to use it more consistently. Some planners might also come bundled with digital stickers or have specific features optimized for certain apps.
- Cost: Digital planners range from free samples and basic templates to premium, feature-rich paid options. Determine your budget. Free planners are excellent for trying out digital planning, while premium planners often offer more comprehensive layouts, unique features, or dedicated support.
Investing a little time upfront to consider these factors will help you select a digital planner that you’ll not only use but genuinely enjoy, making your transition to digital organization much smoother and more effective.
Dated vs. Undated Planners
One of the first big decisions you’ll make when selecting your digital planner file is choosing between a dated and an undated format. Understanding the difference and the benefits of each will help you pick the one that best suits your planning rhythm.
- Dated Planners: These planners come with specific dates (days, weeks, months) already filled in for a particular calendar year (e.g., a 2024 planner). Think of them like the traditional paper planners you’d buy off the shelf.
- Pros: The main advantage is convenience. They are ready to use immediately – no need to write in dates yourself. The pre-filled structure can feel familiar and helps ensure you don’t miss entering dates correctly. They provide a clear, linear progression through the year.
- Cons: Their primary drawback is inflexibility. They are only usable for the specific year they are designed for, meaning you’ll need to purchase a new one annually. If you skip planning for a week or month, you’ll be left with blank, unusable pages, which some people find discouraging or wasteful.
- Undated Planners: These planners provide the full structure (monthly, weekly, daily layouts, tabs, etc.) but leave the specific dates blank for you to fill in.
- Pros: The biggest benefits are flexibility and reusability. You can start using an undated planner at any point during the year without wasting pages. If you miss a day or even a few weeks, you can simply pick up where you left off without leaving obvious gaps – just date the next page you use. Crucially, you can reuse the same planner file year after year by simply dating the pages again, making them potentially more cost-effective and eco-friendly in the long run.
- Cons: The main downside is the initial setup time required. You’ll need to manually write or type in the dates for the months, weeks, and days as you go or perhaps batch-date sections in advance. This requires a bit more effort upfront compared to a dated planner.
To help you visualize the trade-offs, here’s a quick comparison:
| Format | Pros | Cons |
|---|---|---|
| Dated | – Ready to use immediately – Pre-filled structure, less setup – Familiar traditional format | – Single-year use (requires annual purchase) – Wasted pages if periods are skipped – Less flexible start date |
| Undated | – Reusable year after year (cost-effective) – Start anytime – Flexible; no wasted pages if you skip days/weeks – Eco-friendly (reduces repurchase) | – Requires initial effort to write in dates – Might feel slightly less structured initially |
So, which format is right for you?
- Choose a dated planner if you prefer the convenience of having everything set up, plan consistently day-by-day, and don’t mind purchasing a new planner each year.
- Choose an undated planner if you value flexibility, want the option to reuse your planner, appreciate the cost savings, are concerned about sustainability, or if your planning consistency might vary (allowing you to skip periods without “wasting” the planner).
Ultimately, the best choice depends on your personal planning style, consistency, and priorities regarding convenience versus flexibility and reusability.
Layout and Content Needs
Beyond the dated or undated format, the internal structure – the layout and content – of a digital planner is crucial for ensuring it fits how you think and organize. Choosing a layout that resonates with your planning style and ensuring the planner includes the sections you actually need will make using it feel intuitive and effective.
First, consider the core calendar views. Most planners offer:
* Monthly Views: Great for seeing the big picture, planning events, and setting monthly goals.
* Weekly Views: Often the workhorse of a planner, used for scheduling appointments, listing tasks for the week, and tracking progress.
* Daily Views: Ideal for detailed planning, time-blocking specific hours, extensive to-do lists, journaling, or tracking minute details.
Within the weekly and daily views, you’ll typically encounter two main layout orientations:
* Vertical Layouts: These usually feature columns for each day, often with time slots. They are excellent if you like to schedule your day hour-by-hour (time-blocking) or need a clear visual timeline.
* Horizontal Layouts: These provide wider, lined or unlined boxes for each day, arranged horizontally across the page spread. They are often preferred by those who focus more on task lists, general notes for the day, or journaling, rather than strict time scheduling.
The importance here is matching the layout to your preferred level of detail. Do you need to see your day broken down by the hour, or do you just need space for a checklist? Look at previews of the weekly and daily pages to see which style feels more natural for how you plan.
Beyond the basic calendar pages, think about what else you want your planner to help you with. The beauty of digital planners lies in their variety. You can find specialized planners tailored to specific needs and lifestyles, such as:
* Academic Planners: For students, often including class schedules, assignment trackers, and grade logs.
* Business or Work Planners: Featuring project management pages, meeting notes sections, goal tracking relevant to career objectives, or content planning for entrepreneurs and bloggers.
* Fitness and Wellness Planners: Including workout logs, meal planners, habit trackers for health goals, water intake, mood tracking, or gratitude journaling sections.
* Hobby-Specific Planners: Designed for tracking progress in hobbies like reading, gardening, crafting, etc.
Before committing to a planner, carefully review its contents page or product description to see exactly which sections and templates are included. Does it have the specific pages that align with your goals? Look for things like:
* Goal-setting pages (annual, quarterly, monthly)
* Habit trackers
* Budgeting or finance sections
* Project planning templates
* Meal planning pages
* Various types of notes pages (lined, grid, dotted, blank)
* Contact lists
* Password logs
* Specific trackers relevant to your needs (e.g., mood, sleep, reading)
Choosing a planner with the right combination of layouts that suit your scheduling style and content sections that support your specific goals is key to making digital planning a successful and sustainable habit.
Considering Features and Interactivity
Beyond the basic layout and content sections, the level of interactivity and extra features built into a digital planner significantly impacts its usability and value.
These elements are designed to make navigation seamless and provide additional tools for organization and personalization.
One of the most crucial interactive features you’ll encounter is the use of hyperlinked tabs and buttons.
Think of these as the digital equivalent of the physical tabs in a ring binder or the index in a book.
Most digital planners include clickable tabs (often along the side or top) that instantly jump you to specific sections like each month’s overview, weekly spreads, or dedicated areas for goals or notes.
Dates within monthly or weekly views might also be hyperlinked, allowing you to tap on a specific day number to go directly to that daily page.
This hyperlinking is fundamental for quick navigation, saving you from endlessly scrolling through potentially hundreds of pages to find what you need. Look for planners that clearly feature functional hyperlinks covering all major sections.
Beyond the main navigation tabs, planners might include other helpful interactive elements.
A common example is a pre-linked index page. This acts as a central table of contents where you can click on listed sections (e.g., “Habit Trackers,” “Budget Pages,” “Project Section 1”) to navigate directly to them. This makes accessing less frequently used or custom sections much easier.
Many digital planners also come bundled with extra templates beyond the standard calendar layouts. These add significant value if they align with your needs. Common examples include templates for:
* Meeting notes
* Project planning outlines
* Meal planners and grocery lists
* Detailed habit trackers
* Reading logs
* Password keepers
* Various note paper styles (dotted, grid, lined, blank)
Check the planner’s description to see which, if any, extra templates are included, as these can save you from needing separate notebooks or documents for specific tasks.
Finally, if you enjoy decorating and personalizing, briefly consider how the planner is designed for use with digital stickers.
While you can add stickers to almost any planner, some are specifically created with sticker usage in mind.
This might mean they include plenty of blank space within layouts, offer dedicated pages or sections intended as a “sticker book” area within the planner file itself, or even come bundled with a starter set of matching stickers.
If visual customization is important to you, look for planners that mention sticker-friendliness or include sticker-related features according to Gingerlabs.
Cost Considerations
Finally, let’s talk about the budget. When selecting your digital planner, you’ll find that prices can vary significantly. There’s a wide spectrum available, ranging from completely free options often used as samples or introductory tools, all the way up to premium, intricately designed planners with extensive features.
So, what determines the price tag? Several factors typically come into play:
- Design Complexity: More unique, detailed, or aesthetically elaborate designs often command a higher price.
- Number of Templates & Pages: Planners packed with numerous specialized templates (beyond the basic calendar views), extensive note sections, or hundreds of pages generally cost more than simpler versions.
- Included Extras: Some premium planners come bundled with valuable extras, such as large collections of digital stickers, specialized widgets, or even companion guides, which adds to the overall cost.
- Creator Reputation: Well-established designers or brands known for high-quality products and support might price their planners higher.
If you’re just dipping your toes into the world of digital planning and feel unsure about what features you’ll actually use, it’s often a smart move to start with a free or budget-friendly planner. As mentioned earlier, many creators offer free samples or basic versions. Trying one of these allows you to get a feel for the process and your note-taking app without any financial commitment before investing in a more comprehensive option.
Also, keep in mind the point we discussed about undated planners. While they might have an initial purchase price (unless you find a free one), they represent excellent long-term value. Since you can reuse the same file year after year, an undated planner can be a one-time purchase, potentially saving you money compared to buying a new dated planner annually.
Setting Up Your Digital Planner: Step-by-Step
Okay, you’ve navigated the options and selected your tablet, stylus, note-taking app, and the perfect digital planner file. Now it’s time for the exciting part: getting that planner into your app and ready to use! Don’t worry if this seems technical; the process is generally quite straightforward, especially once you’ve done it once or twice. Let’s break down the initial setup into manageable steps.
Here’s a typical step-by-step guide to get you started:
- Download Your Planner File to Your Tablet: First, you need the planner file itself accessible on your tablet. Depending on where you got it, this might involve:
- Downloading it from an email attachment.
- Clicking a download link in your web browser (like Safari or Chrome).
- Accessing it directly from the marketplace where you purchased it (like Etsy, which often has a dedicated downloads section in your account).
- Import the Planner into Your Note-Taking App: This is the core step where you bring the planner file into the app you chose (e.g., GoodNotes, Notability, Noteshelf, Penly, Xodo). While the exact button names might vary slightly depending on your operating system (iPadOS/Android) and specific app, the general principle is usually one of these:
- Using the “Share” or “Open In” Menu: Navigate to where you saved the planner file (e.g., in your Files app or Downloads folder). Tap on the file to select or open it. Look for a “Share” icon (often a square with an upward arrow on iOS, or three connected dots on Android). Tap it, and then look for an option like “Open In,” “Copy to [App Name],” or simply the icon of your chosen note-taking app. Select your app, and it should automatically open and import the planner.
- Importing from Within the App: Alternatively, open your note-taking app first. Look for an “Import,” “Add,” or “+” button within the app’s main library or file management screen. Tap it, and then navigate to the location where you saved your planner file and select it to import.
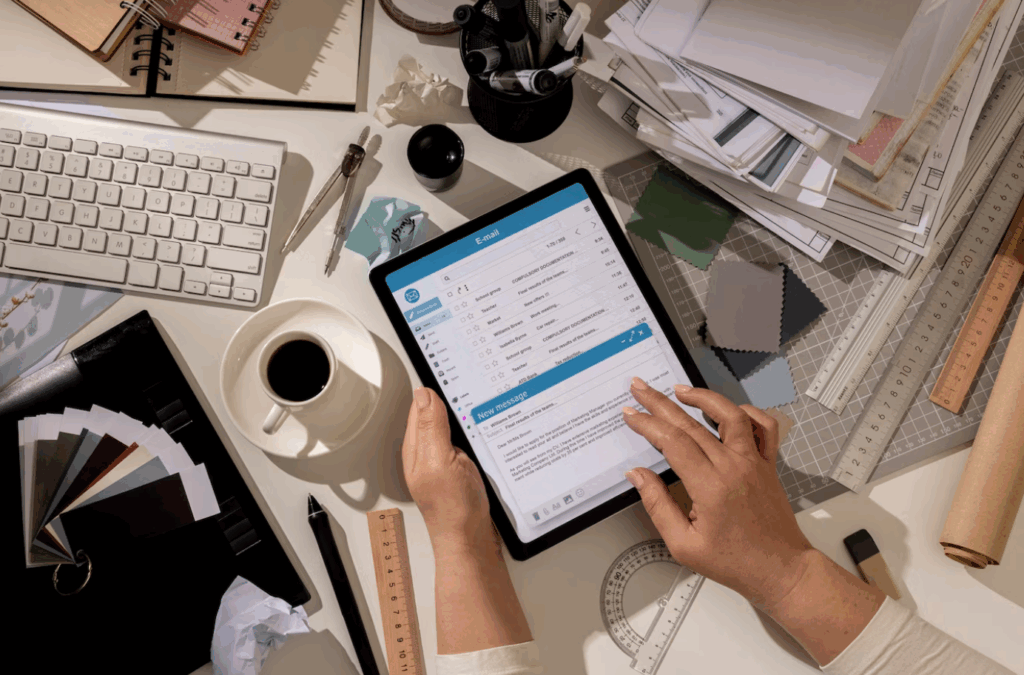
- Initial Check & Familiarization: Once imported, your planner should appear as a new document or notebook within your app. Open it up! Take a moment to:
- Test the Hyperlinks: Tap on the tabs (months, sections, index) and any linked dates to ensure they navigate correctly. This is key to efficient use. Note: Some apps require you to be in a specific “Read-Only” or “Navigation” mode (often toggled by tapping an icon that looks like a crossed-out pen) for hyperlinks to work.
- Locate Basic Tools: Find the main tools you’ll use: the pen/pencil tool for writing, the eraser, the text tool for typing, and perhaps the highlighter. Try writing a quick note on a test page.
- Consider Duplicating (Optional but Recommended): Before you start filling it out extensively, consider making a duplicate copy of the clean, original planner within your app. This gives you a fresh backup in case you want to start over or experiment without altering the original template. Most apps have a duplicate function in their file management options.
And that’s essentially it! You’ve successfully downloaded your digital planner and imported it into your note-taking app. While these steps might seem detailed initially, you’ll quickly get the hang of it. Your planner is now ready for you to start organizing your life digitally!
Downloading and Importing the Planner File
Alright, you’ve found your digital planner file! The next crucial step is getting that file onto your tablet and into the note-taking app you chose. This involves two main actions: downloading the file to your device and then importing it into your app. Here’s how you typically do it:
First, you need to download the planner file to your tablet. Depending on where you acquired it, this usually involves:
* Clicking a download link provided after purchase (often found in your confirmation email or within your account on marketplaces like Etsy).
* Downloading it directly from the creator’s website or a freebie landing page.
* Saving an attachment from an email.
When you download the file (which is most often an interactive PDF, but sometimes an app-specific format like .goodnotes), make sure you know where it’s being saved on your tablet. Common locations include:
* Your tablet’s default Downloads folder.
* The Files app (on iPadOS or Android file managers).
* A specific cloud storage folder that syncs with your Files app (like iCloud Drive, Google Drive, Dropbox, or OneDrive). Knowing the exact location is key for the next step.
Once the file is downloaded onto your tablet, you need to import it into your chosen note-taking app (like GoodNotes, Penly, Noteshelf, etc.). While the exact button labels might differ slightly between apps and operating systems (iPadOS vs. Android), there are generally two common ways to do this:
- Using the ‘Share’ or ‘Open In’ Menu: Navigate to the location where you saved the planner file (e.g., using the Files app). Tap the file. Look for the ‘Share’ icon (often a square with an upward arrow on iOS, or three connected dots/share symbol on Android). Tap this icon, and from the menu that appears, select “Open in [Your App Name],” “Copy to [Your App Name],” or simply tap the icon of your note-taking app. The app should then launch and begin importing the planner.
- Importing from Within the App: Open your note-taking app first. Look for an ‘Import,’ ‘New,’ or ‘+’ button, usually visible in the app’s main library or document view. Tap it, select an option like ‘Import Document,’ and then navigate through your tablet’s file system to find and select the planner file you downloaded earlier.
Need help? If you run into trouble, don’t hesitate to refer to any instructions provided by the planner seller, as they often include app-specific guidance. You can also check the help section or website for your specific note-taking app, as they usually have detailed tutorials on importing PDFs.
Quick Tip on Potential Issues: Occasionally, you might encounter minor hiccups. Very large planner files can sometimes take a moment to download or import, especially on slower connections.
Also, double-check that the file format is compatible with your app (e.g., a standard PDF is widely compatible, but a .goodnotes file will generally only open correctly in GoodNotes). Ensuring compatibility beforehand, as discussed earlier, usually prevents these issues.
Navigating Your Planner Pages
Now that your digital planner is successfully imported into your note-taking app, let’s explore how you actually move around within its pages. Getting comfortable with navigation is key to using your planner efficiently. There are typically 3 main ways to navigate:
- Using Built-In Hyperlinks: This is where the “interactive” part of your interactive PDF planner shines! Most digital planners are designed with clickable elements – hyperlinks – that allow you to instantly jump between different sections. Look for:
- Tabs: Often located along the top, bottom, or side of the pages, mimicking physical planner tabs. Tapping a month’s tab (e.g., “Jan,” “Feb”) will usually take you directly to that month’s overview page. Other tabs might link to yearly calendars, index pages, or custom sections (like Goals, Budget, Notes).
- Buttons & Index Links: Planners often include buttons on specific pages or a dedicated index page with clickable links to various sections, weekly views, or even specific templates.
- Linked Dates: Within monthly or weekly views, the individual day numbers are frequently hyperlinked, allowing you to tap a specific date to jump straight to that daily page.
- Swiping Left and Right: Just like turning the pages of a physical book or browsing photos on your tablet, you can simply swipe horizontally across the screen. Swiping from right-to-left typically turns to the next page, and swiping from left-to-right goes to the previous page. This is great for moving sequentially through your weekly or daily layouts.
- Using the App’s Page Overview/Thumbnail View: For jumping across large distances within your planner (e.g., from January to October, or finding a specific notes page quickly), swiping can be tedious. Most note-taking apps offer a page overview or thumbnail view. This displays a grid of small images representing multiple pages of your planner at once. You can usually access this view via an icon (often looking like four small squares or stacked pages) in the app’s toolbar. Simply scroll through the thumbnails and tap on the specific page you want to jump to.
Keep in mind that while these navigation methods are common, the exact location of icons or the specific way features work might vary slightly depending on the note-taking app (GoodNotes, Notability, Penly, Noteshelf, Xodo, etc.) you are using.
Don’t hesitate to explore your app’s toolbar and menus to familiarize yourself with its specific navigation tools.
Understanding the Basic App Tools
Now that you know how to navigate through your digital planner’s pages using hyperlinks and swipes, it’s time to familiarize yourself with the essential tools within your note-taking app.
These tools are what allow you to actually write, draw, type, and interact with your planner, bringing it to life. Most apps feature a toolbar, often at the top of the screen, where you’ll find these core functions:
- The Pen/Pencil Tool: This is your primary tool for handwriting notes, appointments, to-do lists, or even doodling directly onto the planner pages using your stylus. Most apps offer various pen styles (like ballpoint, fountain pen, brush pen), a wide range of colors, and adjustable line thicknesses, allowing you to customize your writing just like you would with physical pens.
- The Highlighter Tool: Just like its physical counterpart, the digital highlighter lets you emphasize important text or sections. You can typically choose different colors and thicknesses. It’s perfect for marking deadlines, highlighting key events, or color-coding different types of tasks or appointments. Many digital highlighters even have an option to snap to straight lines, keeping your highlighting neat.
- The Eraser Tool: Made a mistake? No problem! The eraser tool lets you easily remove handwritten notes, drawings, or highlights without any smudging or mess – a significant advantage over paper planners. Apps usually offer different eraser sizes for precision work or clearing larger areas quickly. Some even have options to erase only the highlighter layer or entire strokes.
- The Text Box Tool: If you prefer typing over handwriting, or want particularly neat entries for certain sections, the text tool is your friend. Simply tap where you want to add text, and a box will appear, allowing you to type using your tablet’s keyboard. You can usually customize the font, size, color, and alignment of your typed text.
- The Lasso Tool: This is one of the most powerful and versatile tools in digital planning. The lasso tool allows you to draw a freehand selection around any handwritten notes, drawings, typed text, images, or stickers on your page. Once selected, you can easily:
- Move the selection to a different spot on the page or even to another page.
- Resize it (make it bigger or smaller).
- Copy and Paste it (great for recurring tasks or decorations).
- Delete the entire selection.
- Often, you can also Recolor handwritten text or change the style after it’s been written. This tool makes rearranging your plans incredibly flexible.
- Adding Images or Shapes: Most note-taking apps also allow you to insert images directly onto your planner pages. This is commonly used for adding digital stickers – pre-made decorative or functional images (like icons, banners, or labels) that help personalize your planner. You might also find tools to draw basic shapes like lines, circles, squares, or arrows, which can be useful for creating dividers, checkboxes, or diagrams.
Take some time to tap on each of these tools in your app and experiment on a blank page or a test section of your planner based on Drawboard.
Getting comfortable with these basic functions is the key to making your digital planner a truly useful and personalized organizational tool.
Using Your Digital Planner Effectively
Congratulations! You’ve successfully imported your digital planner into your note-taking app and familiarized yourself with the basic navigation and tools.
But having the setup complete is just the beginning. The real power of digital planning comes from actively using it to enhance your organization, boost productivity, and personalize your planning experience.
Let’s dive into some practical tips and techniques to help you make the most of your new digital system.
Start by embracing the flexibility of input methods. Experiment with the Pen/Pencil tool – find the styles, colors, and thicknesses that feel most comfortable and motivating for you.
Consider using color-coding for different types of tasks or appointments to quickly visualize your schedule. If handwriting isn’t your preference or you need ultra-neat entries, utilize the Text Box tool.
One of the biggest advantages over paper is the ease of correction; don’t hesitate to use the Eraser tool liberally to keep your planner tidy and adaptable as plans change. The Lasso tool is your best friend for rearranging – use it to move tasks to different days, resize notes, or copy recurring events without rewriting.
Make navigating your planner effortless by consistently using the built-in hyperlinks. Get into the habit of tapping tabs, dates, and index links to jump between sections quickly. Remember that most apps require you to switch to a “Read-Only” or “Navigation” mode (often toggled via a toolbar icon) for these links to become active. Efficient navigation saves time and makes accessing different parts of your planner seamless.
Explore all the sections and templates your planner offers beyond the basic calendar views. Make the most of dedicated pages for goal setting, habit tracking, project planning, or notes. If your planner includes extra templates (like meeting notes or meal planners), figure out how they can fit into your workflow. Most apps allow you to easily duplicate pages, so if you need more notes pages or find yourself using a specific template frequently, simply copy it as needed. This keeps all your related planning within one organized document.
Don’t shy away from personalization! Use digital stickers or insert images to add visual appeal and personality to your pages. Stickers aren’t just decorative; they can be functional too. Use icons to represent recurring tasks, banners to highlight important events, or pre-made labels for common categories. Again, the Lasso tool is invaluable here for resizing, moving, and layering your decorative elements precisely.
If your chosen note-taking app supports cloud synchronization (like iCloud, Google Drive, Dropbox), make sure it’s enabled. This ensures your planner is backed up and accessible across multiple devices (like your tablet and smartphone). Being able to quickly check your schedule or add a note on the go adds another layer of convenience.
Finally, remember that consistency is key to effective planning, whether digital or paper. Try to build the habit of opening and using your planner daily, perhaps as part of your morning or evening routine. Start small – you don’t need to fill every single box or use every feature immediately. Focus on the core functions that help you most right now. As you get more comfortable, you can explore more advanced features and adapt your system to perfectly suit your evolving needs. The beauty of digital planning lies in its flexibility and adaptability.
Writing vs. Typing in Your Planner
Once you’re comfortable with the basic tools, you’ll face a fundamental choice for adding information to your digital planner: should you handwrite with your stylus or type using the text tool?
Both methods have distinct advantages, and the best approach often depends on your personal preference and the specific task at hand.
Handwriting with a Stylus:
Using your stylus (like an Apple Pencil or S Pen) offers a more personal and tactile feel, closely mimicking the traditional pen-on-paper experience many users enjoy. It’s often faster for quick notes, jotting down ideas, checking off tasks, or creating simple diagrams and mind maps. If you enjoy the visual aspect of planning and the unique look of your own handwriting, this method provides that personal touch. Plus, as mentioned in the knowledge section, the ease of using the eraser tool means your handwritten notes can still be kept remarkably neat and tidy, offering a seamless experience.
Typing with the Text Tool:
Opting for the text tool provides unparalleled neatness and legibility, which can be particularly beneficial for longer entries, detailed notes, or information you want to be easily readable at a glance. Typed text is incredibly easy to edit, resize, and move using the lasso tool without any mess. A significant advantage, depending on your note-taking app, is that typed text is often searchable. This means you could potentially search your entire planner for specific keywords, names, or appointments later on – a powerful feature unavailable with handwritten text in most apps.
Finding Your Flow: Experiment or Combine
Ultimately, there’s no single “right” way to fill in your digital planner. The best approach is to experiment and discover what works best for you. You might find you prefer handwriting for daily to-do lists and quick appointments but switch to typing for weekly reflections or detailed meeting notes. Many users find a combination of both methods offers the most flexibility. Don’t be afraid to mix handwritten annotations with typed blocks of text on the same page. Embrace the flexibility of digital planning and tailor your input method to your needs and style!
Utilizing Built-in Templates and Sections
Your digital planner is much more than just a calendar.
To truly harness its power, take the time to explore all the included spreads and sections beyond the standard daily, weekly, and monthly views.
Remember those specialized sections you looked for when choosing your planner?
Now is the time to dive in and make them work for you.
Flip through using the hyperlinks or page overview to see everything your planner offers – you might find valuable tools you initially overlooked.
Actively engage with the specialized templates designed to support your specific goals. For instance:
* If your planner has a habit tracker, make it a daily routine to check off your completed habits.
* Use the goal planning pages to break down large objectives into smaller, actionable steps, referencing them regularly.
* Leverage project planning sections to outline tasks, deadlines, and resources for specific initiatives, whether for work (like those found in a business or self-employed planner) or personal projects.
* Fill out wellness or fitness logs consistently to monitor progress, track meals, or practice gratitude as intended by the template design.
* Utilize dedicated notes sections (lined, dotted, grid, blank) for brainstorming, meeting minutes, or journaling.
Don’t feel limited by the initial number of pages provided for certain sections.
One of the great advantages of digital planning is the ability to duplicate pages easily.
If you find yourself needing more space for notes, want to reuse a specific weekly layout multiple times for different projects, or need additional copies of a project planning template, most note-taking apps allow you to do this.
Typically, you can find a “duplicate,” “copy,” or “insert page” option within the app’s page thumbnail view or editing menu. This lets you add exactly what you need, right where you need it, keeping everything organized within your single planner file.
Finally, remember that templates are a starting point, not rigid rules. Feel free to adapt templates to better fit your personal needs.
Perhaps a section in a daily layout isn’t relevant to you – simply ignore it or cover it with a digital sticker or text box containing information you do need.
Maybe a notes section within a template could be repurposed for quick lists.
You can often use the Lasso tool (mentioned earlier) to select and slightly modify existing elements or add your own handwritten notes and diagrams to customize a template’s function.
Embrace the flexibility – make the planner work for your unique style and requirements.
Incorporating Digital Stickers and Inserts
One of the most enjoyable aspects of digital planning is the ability to personalize your pages and add extra functionality using digital stickers and inserts.
Let’s break down what these are and how you can use them to enhance your planner.
What are Digital Stickers and Inserts?
- Digital Stickers: Think of these like traditional stickers, but in digital form! They are typically image files, most commonly PNG files with transparent backgrounds. The transparency is key, as it allows you to place the sticker over parts of your planner page without obscuring everything behind it with a solid white box. Stickers serve various purposes: pure decoration (adding flair and personality), functional icons (like little mail icons for reminders, stars for priorities, or weather symbols), or labels and banners to highlight specific information.
- Digital Inserts: These are usually separate PDF pages or small PDF documents designed to be added into your existing digital planner. They provide extra layouts or specialized sections that might not have been included in your original planner file. Examples include detailed budget trackers, specific project management layouts, habit trackers with unique designs, or specialized journaling pages. They essentially allow you to add new types of functionality on demand.
Why Use Them?
Stickers and inserts allow you to:
* Decorate and Personalize: Make your planner visually appealing and uniquely yours.
* Highlight Information: Use banners or functional stickers to draw attention to important events or tasks.
* Add Functionality: Incorporate new tracking methods or planning layouts using inserts without needing a whole new planner.
How to Import Stickers and Inserts
Getting these elements into your planner within your note-taking app is usually straightforward, though the exact method might vary slightly depending on the app (like GoodNotes, Penly, Noteshelf, etc.) and your tablet’s OS:
- Importing Stickers (PNG files):
- Split-Screen: On many tablets (especially iPads and some Android devices), you can open your note-taking app and your Files app (or Photos app) side-by-side in split-screen view. Simply drag the PNG sticker file from Files/Photos and drop it directly onto your planner page.
- Image Tool: Most note-taking apps have an ‘Image’ or ‘Insert’ tool in their toolbar. Select this tool, then navigate to where you saved your sticker file on your tablet and select it to place it on the page.
- App’s Elements/Sticker Feature: Some apps, like GoodNotes with its ‘Elements’ tool, allow you to save frequently used stickers within the app itself for quick access without needing to import them repeatedly.
- Importing Inserts (PDF files): Adding PDF inserts usually involves importing pages into your current planner document. Look for options within your app’s page management view (where you see thumbnails of all pages). There might be an ‘Add Page,’ ‘Import,’ or ‘+’ button that allows you to select a PDF file from your device and insert its pages at your desired location within the planner. Check your app’s help guide for specific instructions on adding pages from external PDFs.
Positioning and Resizing Stickers
Once a sticker is placed on your page:
1. Select: Tap the sticker with your stylus or finger. Handles (small dots or squares) should appear around its border.
2. Resize: Tap and drag one of the corner handles to make the sticker larger or smaller while maintaining its proportions.
3. Rotate: Look for a specific rotation handle (often appearing alongside the resizing handles) and drag it to rotate the sticker.
4. Position: Tap and drag the selected sticker anywhere on the page to place it exactly where you want it.
5. Refine: Remember the Lasso tool? You can often use it to select stickers (and other elements) later to move, resize, copy, or delete them easily.
Don’t be afraid to experiment! Layering stickers, combining them with handwriting or text, and using inserts creatively can make your digital planner an even more powerful and personalized tool.
Leveraging Hyperlinks for Connectivity
As you’ve already seen, the pre-built hyperlinks (like tabs and dated links) are fundamental for quickly navigating the core sections of your digital planner.
They save you time and make jumping between monthly, weekly, and daily views effortless.
However, the power of linking in digital planning can extend even further, transforming your planner into a truly connected hub, depending on the capabilities of your chosen note-taking app.
Beyond the built-in navigation, many note-taking apps allow you to create your own internal links within the planner document. Imagine you’ve listed a complex task on your weekly spread.
If your app supports it, you could potentially create a link directly from that task entry to a separate, detailed project notes page located elsewhere within the same planner file.
This creates seamless connections between related pieces of information, allowing you to jump from a summary view to detailed notes with a single tap, keeping everything organized and accessible right where you need it.
Check your app’s features or help guides to see if it offers internal page linking capabilities.
Furthermore, you might also be able to insert external hyperlinks directly onto your planner pages.
This opens up possibilities for connecting your planner to resources outside the document itself. For example:
* You could link a recipe listed in your meal plan directly to the recipe’s webpage.
* You could link a meeting entry to a shared document stored in your cloud storage (like Google Drive or Dropbox).
* You could link a project task to a relevant online resource or research article.
By incorporating both user-created internal links and external hyperlinks, you significantly enhance the connectivity of your digital planner.
It moves beyond being just a standalone document and becomes a dynamic dashboard, linking relevant internal details and connecting seamlessly to the vast array of external digital resources you use daily.
Syncing Your Planner Across Devices
One of the fantastic advantages of digital planning is the ability to keep your planner updated and accessible no matter which device you’re using – whether it’s your primary tablet, your smartphone on the go, or even your computer.
This seamless access is achieved through synchronization, ensuring your plans are always current and readily available.
How does this magic happen? Most popular note-taking apps achieve this through cloud synchronization.
They don’t store your planner solely on one device; instead, they leverage familiar cloud storage services like iCloud, Google Drive, Dropbox, or OneDrive.
Your note-taking app securely saves your planner file and any changes you make (like added notes, checked tasks, or new appointments) to one of these cloud services.
When you open the app on another compatible device logged into the same account, it retrieves the latest version from the cloud, keeping everything in sync.
To enable this feature, you’ll typically need to dive into your note-taking app’s settings menu.
Look for options related to ‘Sync,’ ‘Cloud Storage,’ ‘Backup,’ or the specific name of the cloud service (e.g., ‘iCloud Settings’).
You’ll usually need to select your preferred cloud service, log in to your account (if you aren’t already), and ensure the sync option is turned on. Specific steps vary by app, so consult the app’s built-in help guide or website for detailed instructions tailored to your software.
While syncing allows seamless viewing across devices, keep in mind potential limitations regarding the editing experience.
The full interactive planning process, especially detailed handwriting with a stylus, using complex tools like the lasso, or arranging intricate sticker layouts, is often best suited to your primary device – usually your tablet with its larger screen and stylus support.
Your phone might be perfect for quickly checking your schedule, adding a brief typed note, or ticking off a task, while a computer could be useful for viewing or typing longer entries.
However, for intensive planning sessions, you’ll likely find the tablet offers the most optimized and comfortable experience.
Tips for Consistency and Productivity
You’ve got the tools, the planner, and the know-how to use the basic features.
But like any planning system, digital or paper, its true value unlocks only through consistent use.
Simply put, consistency is the absolute key to successful digital planning.
Regularly engaging with your planner is what allows you to effectively track progress, stay on top of tasks, meet your goals, and ultimately feel more organized and in control. Without it, even the most feature-rich planner becomes just another unused file.
So, how do you build that crucial consistency and boost your productivity? Here are some practical tips:
- Establish a Regular Planning Routine: This is perhaps the single most effective strategy. Dedicate a specific time each day or week to interact with your planner. For many, this means a brief daily check-in – maybe 5-10 minutes each morning to review the schedule and top priorities, or an evening session to reflect on the day and prepare for the next. Complement this with a weekly review, perhaps on Sunday evening, to plan the upcoming week, review progress on goals, and migrate tasks. Find a rhythm that fits your schedule and stick to it as much as possible.
- Start Simple, Then Grow: As a beginner diving into the world of digital planning, it’s easy to feel overwhelmed by all the features, templates, and possibilities. Don’t try to implement everything at once! Start small. Focus on mastering the core functionalities that address your immediate needs, whether that’s daily scheduling, managing a to-do list, or tracking key appointments. Once you’re comfortable with the basics, gradually incorporate more advanced features like detailed habit tracking, complex project layouts, or extensive sticker decoration. Starting simple makes the habit easier to form and sustain.
- Customize to Make it Enjoyable: Leverage the personalization power of digital planning to create a space you genuinely want to use. Choose planner themes, color palettes, digital pen styles, and stickers that appeal to your aesthetic. When your planner feels like a reflection of your personality and is visually inviting, you’ll be more motivated to open it regularly. This isn’t just superficial decoration; it’s about creating a positive user experience that encourages engagement.
- Periodically Review and Adjust: Your needs and priorities aren’t static, and neither should your planning system be. Set aside time occasionally (e.g., monthly or quarterly) to review how your digital planner is working for you. Are the layouts still effective? Are you consistently using the sections you thought you needed? Is your planning routine still realistic? The beauty of digital is its flexibility. If something isn’t working, adjust it! Try duplicating a different template page, rearrange sections using the lasso tool, or tweak your daily check-in time. This flexibility is also a benefit if you use an undated planner; should you miss a few days, you can simply pick up where you left off without feeling discouraged by blank, dated pages.
- Integrate with Other Productivity Tools: Your digital planner doesn’t need to operate in isolation. Think about how it can connect with other tools in your digital ecosystem. For instance, when you add an important deadline or appointment to your planner, immediately set a corresponding reminder in your phone’s calendar or reminder app. If you use dedicated project management software, ensure your planner tasks align with your project timelines. This integration creates a more cohesive and powerful productivity system, with your planner often serving as the central hub for organizing your thoughts and plans before executing them with other tools.
The Bottom Line
Digital planners are interactive PDF files used on tablets with note-taking apps that mimic traditional paper planners while offering digital advantages. They provide structured layouts with hyperlinked tabs for easy navigation between monthly, weekly, and daily views, plus sections for goals, trackers, and notes.
Key benefits include:
- Portability (entire planner on one device)
- Customization (add digital stickers, change layouts)
- Eco-friendly (reduces paper waste)
- Cost savings (especially undated versions reusable year after year)
Essential tools needed:
- Tablet (iPad or Android)
- Stylus (for writing and navigation)
- Note-taking app (GoodNotes, Notability, Noteshelf, etc.)
- Digital planner file (interactive PDF)
Digital planners can be found on marketplaces like Etsy, creator websites, or as free samples. They offer both dated and undated formats with various layouts and specialized templates for different needs.
5 FAQs About Digital Planners
1. What exactly is a digital planner and how is it different from a regular calendar app?
A digital planner is an interactive PDF file designed to look and function like a traditional paper planner, but used on a tablet with a note-taking app. Unlike basic calendar apps that just schedule appointments, digital planners offer a structured, integrated layout with hyperlinked tabs for easy navigation between monthly, weekly, and daily views, plus dedicated sections for goals, trackers, notes, and more. They combine the familiar visual structure of paper planning with digital flexibility.
2. What equipment do I need to start using a digital planner?
You need four essential components: 1) A tablet (iPad or Android tablet), 2) A compatible stylus (like Apple Pencil or S Pen), 3) A note-taking app that supports PDF annotation and hyperlinks (such as GoodNotes, Notability, Noteshelf, or Penly), and 4) The digital planner file itself. The tablet is your primary device as it provides the ideal screen size and touch interface needed to replicate the experience of writing in a physical planner.
3. Should I choose a dated or undated digital planner?
It depends on your planning style. Dated planners come with pre-filled dates for a specific year, making them ready to use immediately, but you’ll need to purchase a new one annually. Undated planners provide the structure but leave dates blank for you to fill in, offering more flexibility to start anytime, skip periods without wasting pages, and reuse the same planner year after year, making them potentially more cost-effective and eco-friendly.
4. How do I navigate through my digital planner?
There are three main ways to navigate: 1) Using built-in hyperlinks (tabs, buttons, and linked dates that let you jump instantly between sections), 2) Swiping left and right (like turning pages in a physical book), and 3) Using your app’s page overview/thumbnail view to jump across large distances. To use hyperlinks, your note-taking app usually needs to be in “Read-Only” or “Navigation” mode, which is typically toggled via an icon in the toolbar.
5. How can I personalize my digital planner and make it more functional?
You can personalize your planner by adding digital stickers (PNG images with transparent backgrounds) for decoration or functional indicators, importing custom inserts (PDF pages with specialized layouts), creating your own hyperlinks between related information, and utilizing different pen styles, colors, and text options. Most note-taking apps allow you to duplicate pages if you need more of a specific template, and you can use the Lasso tool to move, resize, copy, or modify elements to customize templates to your specific needs.